This is the first time we use a slider in our robot, and we quickly noticed an issue with the design. We are using a servo motor to move a gripper mounted on the slider. Since it has to reach a height of almost 3 feet, we used several servo extensions. There are several problems with this. With the continuous up and down movement of the gripper, the extensions tend to disconnect from each other. Also, when it extends up and then down the cable can get tangled on the robot’s parts, or even worse, it can be cut!
Our mentor mentioned the coiled cables that were used on telephones in the past. That would be a good solution, but after checking the FTC rules, the servo cable must be either the same wire gauge that the servo comes with, or gauge 22. We could not source a coiled telephone cable with documented wire gauge. But we found a method online for creating coiled cables out of regular cable that involves heating the cable while it is wrapped around a wooden dowel. However, since our cable is going to be repeatedly extended, we modified the process a little bit. This post serves as documentation of the process, and we are sharing it so that it is useful to other First Tech Challenge (FTC) teams. Here is the process we followed:
Materials:
- Gauge 22 stranded cable (FTC required gauge for servos). 8 Feet will result in about 2 ft of coiled cable, depending on the rod diameter. We used 4 copper wire shielded and grounded cable. We sourced it locally, but it would be better to use a 3 wire cable instead. This is probably a good choice from Amazon.com: Striveday 22 AWG 4 conductor wire Power Cable Audio Cable Signal Line (Red & Black & yellow & white) 33ft UL certification : Electronics
- Heat shrinking tubes a little bit bigger than the cable diameter.
- Heat shrinking tube a little bit bigger than the individual wires.
- Any kind of rod or wooden dowel, as long as the end length of the coiled cable.
- Hair dryer, or heat gun (better).
- 1 Servo extension cable (short).
- Soldering iron
- Solder
- Multimeter
Process:
- Insert the cable in two 4 feet long heat shrinking tubes.
- We used two 4 ft tubes, so we had to add an overlap at the middle by heating one tube a little bit so that it shrinks and can be inserted into the other.
- Inserting the tubes is not an easy task. The longer the heat shrinking tube, the better the results. Also, using a heat shrinking tube that is just bigger than the cable results in a tighter coil.
- Leave the ends of the cable free (no heat shrink tube).
- Wrap the cable around the rod. We used an aluminum rod about 1/2 in.
- Tape the ends so that it does not uncoil.
- We noticed that even though the initial wrapping was very tight, as the tubes start to shrink it loses some tightness. It may be better to hold only one end and try to keep the coil tight on the other end while heat is applied.
- Apply heat to the cable evenly to shrink the tubes. Take your time in this step and make sure the whole length of the cable shrinks. Rotate the rod to ensure both sides are heated evenly.
- Remove the tape and remove the cable from the rod.
- Apply more heat to ensure all the tube has shrunk.
- Strip the ends of the cable.
- Check all the wires for continuity and shorts
- For continuity, check every wire color against the same color on the other end. It should beep on each wire.
- For shorts, check every wire color against the other two colors on the other end. It should not beep.
- Take the servo extension and cut it in the middle.
- Solder each halve of the servo extension cable to the ends of your coiled cable. The colors you use do not matter, as long as you are consistent on both sides. We soldered red to red, black to black, and white to yellow. The green wire, ground, and shield were not needed so we just cut them.
- Before soldering the wires, insert a piece of the large shrinking tube and slide it out of the way. This will be used to cover all the wires after soldered. Also, insert about 1 inch of the smaller shrinking tube on each wire.
- Slide the small diameter tubes to cover the solder and heat them. This will ensure there are not shorts between the cables.
- It is a good idea to check the cable for continuity and shorts again, but this time at the plugs.
- Slide the large diameter tubes to cover the soldered wires while keeping a little bit of overlap with the already shrunk tube, then apply heat.
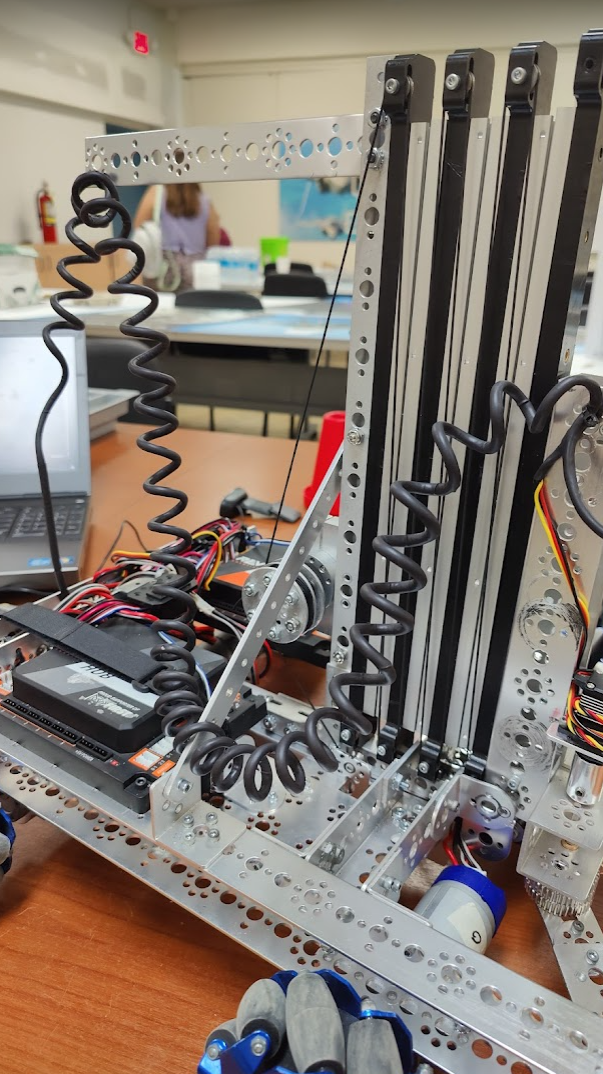
It took us about 1 hour to complete this process with the help of our mentors. The most difficult part is inserting the cable in the heat shrinking tube since each piece is 4 feet long and the friction makes it hard to insert. The end result is really good! We have been using that cable for some time now with zero issues. Below are some pictures and videos of key steps of the process. Please do not look at the mess in the background! 😁


Leave a Reply